
Around this time of year, I always find my house looks sadder. It’s darker all the time, and artificial lighting makes me feel gloomy. This best antidote for this is, obviously, glitter.
The following are five do-it-yourself projects to fill your house, apartment or dorm with holiday cheer– on a budget.
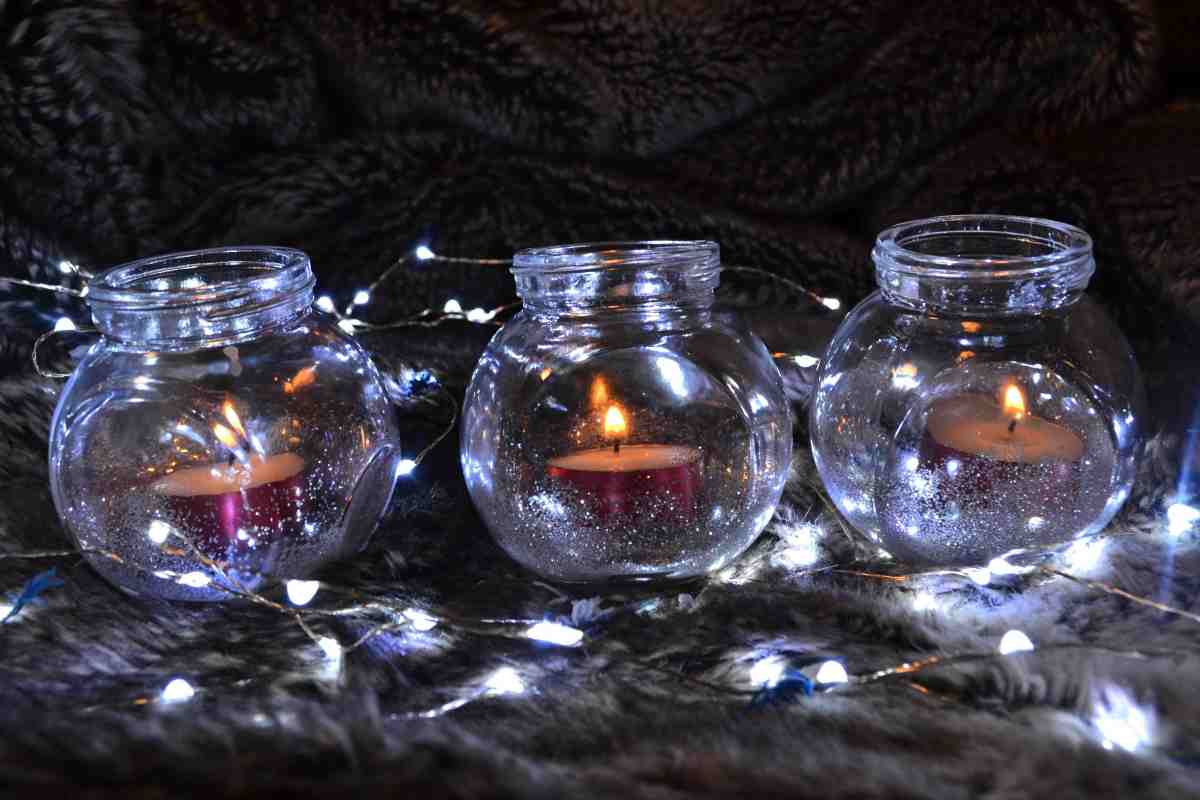
Tea Light Holders
These are probably the simplest craft but turned out to be my favourite. There’s nothing like reading a good book by candlelight with a cup of hot chocolate. If you live in a dorm or apartment where you can’t burn candles, the dollar store does packs of electronic ones for around $2. They give off the same vibe, and you can barely tell the difference through the glitter.
You’ll need:
– Glitter ($1.25 at Dollarama)
– White glue ($1.25 for a pack of 3 tubes at Dollarama)
– Glass spice bottles ($2.50 for a pack of 3 at Dollarama)
– Tealights ($1.25 for a pack of 12 at Dollarama)
– Foam paint brushes ($1.25 for a pack of 5 at Dollarama)
TOTAL: $7.50
Create:
– Paint the inside of your spice bottle with white glue.
– Sprinkle in glitter.
– Shake.
– Insert tea light.
– Enjoy!

Pom Pom Wreath
This wreath is a cute way to decorate your door for cheap! It’s easier and more allergy-friendly than a real pine wreath, and soft enough to cuddle. You can hang it on your door with a Command Hook, and you might even get your damage deposit back.
You’ll need:
– 4 different colours of yarn (I bought two kinds that were $1.25 at Dollarama, and the other two kinds were $3.00, also from Dollarama.)
– Wire hanger (You probably have one of these lying around your house so $0 I guess?)
– Scissors
TOTAL: $8.50
Create:
– Bend your hanger into a circle shape.
– Wrap yarn around your palm approximately 25 times, cut from yarn ball.
– Cut a 2.5 inch section of the same colour of yarn.
– Slide the yarn off your palm, keeping the yarn looped as neatly as possible.
– Tie loops in the middle with 2.5 inch section.
– Cut the looped ends.
– Fluff up your pom pom.
– Tie onto wire hanger.
– Repeat steps 2-8 until hanger is completely covered.

Festive Bunting
I love bunting for all occasions. We have bunting in almost every room in my house, solely because I think it’s cheerful as fuck. The bells on this are optional, but they make it a lot more festive.
You’ll need:
– Metallic tissue paper ($1.25 for a pack at Dollarama– I used two colours.)
– Ribbon ($1.25 for 9.8 feet at Dollarama.)
– Scotch tape ($2.49 at Canadian Tire.)
– Silver bell ornaments ($1.25 for a pack of three at Dollarama– I used three packs.)
– Scissors
TOTAL: $7.49
Create:
– Cut triangles out of tissue paper. Mine were 13cm on the longs sides and 6.5cm on the short side. I left a 2cm rectangle lip along the 6.5cm side.
– Lay out your ribbon and line up bells and paper triangles evenly. I had my bells roughly every foot, and in between the bells I used three paper triangles.
– Tie your bells on in your desired placement, starting with your middle bell and working your way out on each side.
– Fold the rectangle lip of each of your paper triangles over the top of the ribbon and tape onto the back of the triangle.
– Hang on your wall and enjoy!
Glittery branch centrepiece
If I’m being honest, this one turned out way better than I thought it would. I’ve seen these glittery branches at the craft store before and I think mine are way cuter. If you want a rustic vibe and don’t feel like spending $10 for some sticks at Michael’s, this is the DIY for you. Again, the bells are optional, but I think they’re pretty.
You’ll need:
– A vase ($2.50 at Dollarama.)
– Epsom salts ($1.25 for a pack at Dollarama, I used about 1.5 packages.)
– Silver bell ornaments ($1.25 for a pack of three at Dollarama– I used one pack.)
– Glitter ($1.25 at Dollarama.)
– White glue ($1.25 for a pack of 3 tubes at Dollarama.)
– Foam paint brushes ($1.25 for a pack of 5 at Dollarama.)
– Branches (I went outside and picked some up so $0.)
TOTAL: $10
Create:
– Fill your vase up with Epsom salts. I recommend doing this step first because you’ll have somewhere for your branches to stand up while they dry.
– Paint your branches with white glue.
– Sprinkle branches with glitter. You might want to lay down a newspaper for this, it gets a little messy.
– Arrange your bells and branches in your vase in a pleasing way.
Paper Snowflake Garland
Paper snowflakes are a classic craft for the holiday season. I am so good at paper snowflakes that I am considering putting it on my resumé. Not sure how this qualifies as a marketable skill, but it shows that I’m a well-rounded person. This one is a little complicated to write out, so hold onto your horses kiddos, and see the photo for references.

You’ll need:
– Printer paper ($7.49 for a 20lbs pack at Staples.)
– Ribbon ($1.25 for 9.8 feet at Dollarama.)
– Scissors
TOTAL: $8.74
Create:
– Lay your paper down landscape. Take the bottom left corner and fold it up so it meets the top edge of your paper. Crease your fold. You should end up with a triangle with a little rectangular lip at the side.
– Cut off the extra rectangle from the side, so your paper is a perfect triangle.
– Fold that triangle in half, so you have an even smaller triangle. At this point, your triangle should be pointing directly towards you with the open fold along the top side.
– Fold the right side of your triangle in one-third of the way. Fold the other side in so it overlaps completely. Your paper should be in an arrow shape with two points at the top.
– Flip your triangle over. There should be a fold running horizontally along the top of your arrow. Cut the top of your arrow off diagonally from this fold.
– Now it’s time to get creative. You can cut off the bottom point, cut shapes into the sides, and shape the top. Make sure you don’t cut through any folds. You don’t want to get rid of a layer of your snowflake.
– Unfold to see your masterpiece.
– This step is optional, but I tied my snowflakes onto a ribbon to make a fun garland.


